Last March, a homeowner in San Mateo watched as a single season of coastal fog turned their premium stone driveway into a slippery, moss-covered hazard. It’s a common sight across the Peninsula, where high UV exposure can fade stone colors by 30% in just three years while moisture invites stubborn weeds into every joint. You likely invested in your hardscape for its beauty and durability, and it’s frustrating to see that value slip away. Learning how to clean and seal pavers correctly is the only way to stop this cycle of decay.
We understand the hesitation. You want a pristine finish but worry that the wrong chemicals might cause permanent staining or white hazing. Since 1979, our 2nd-generation family business has seen how the right professional approach protects a home’s value for decades. This professional 2026 guide provides the exact techniques needed to restore your stone and prevent future damage. We’ll walk you through the entire process, from deep cleaning salt deposits to applying high-quality sealants that stand up to the unique Bay Area climate.
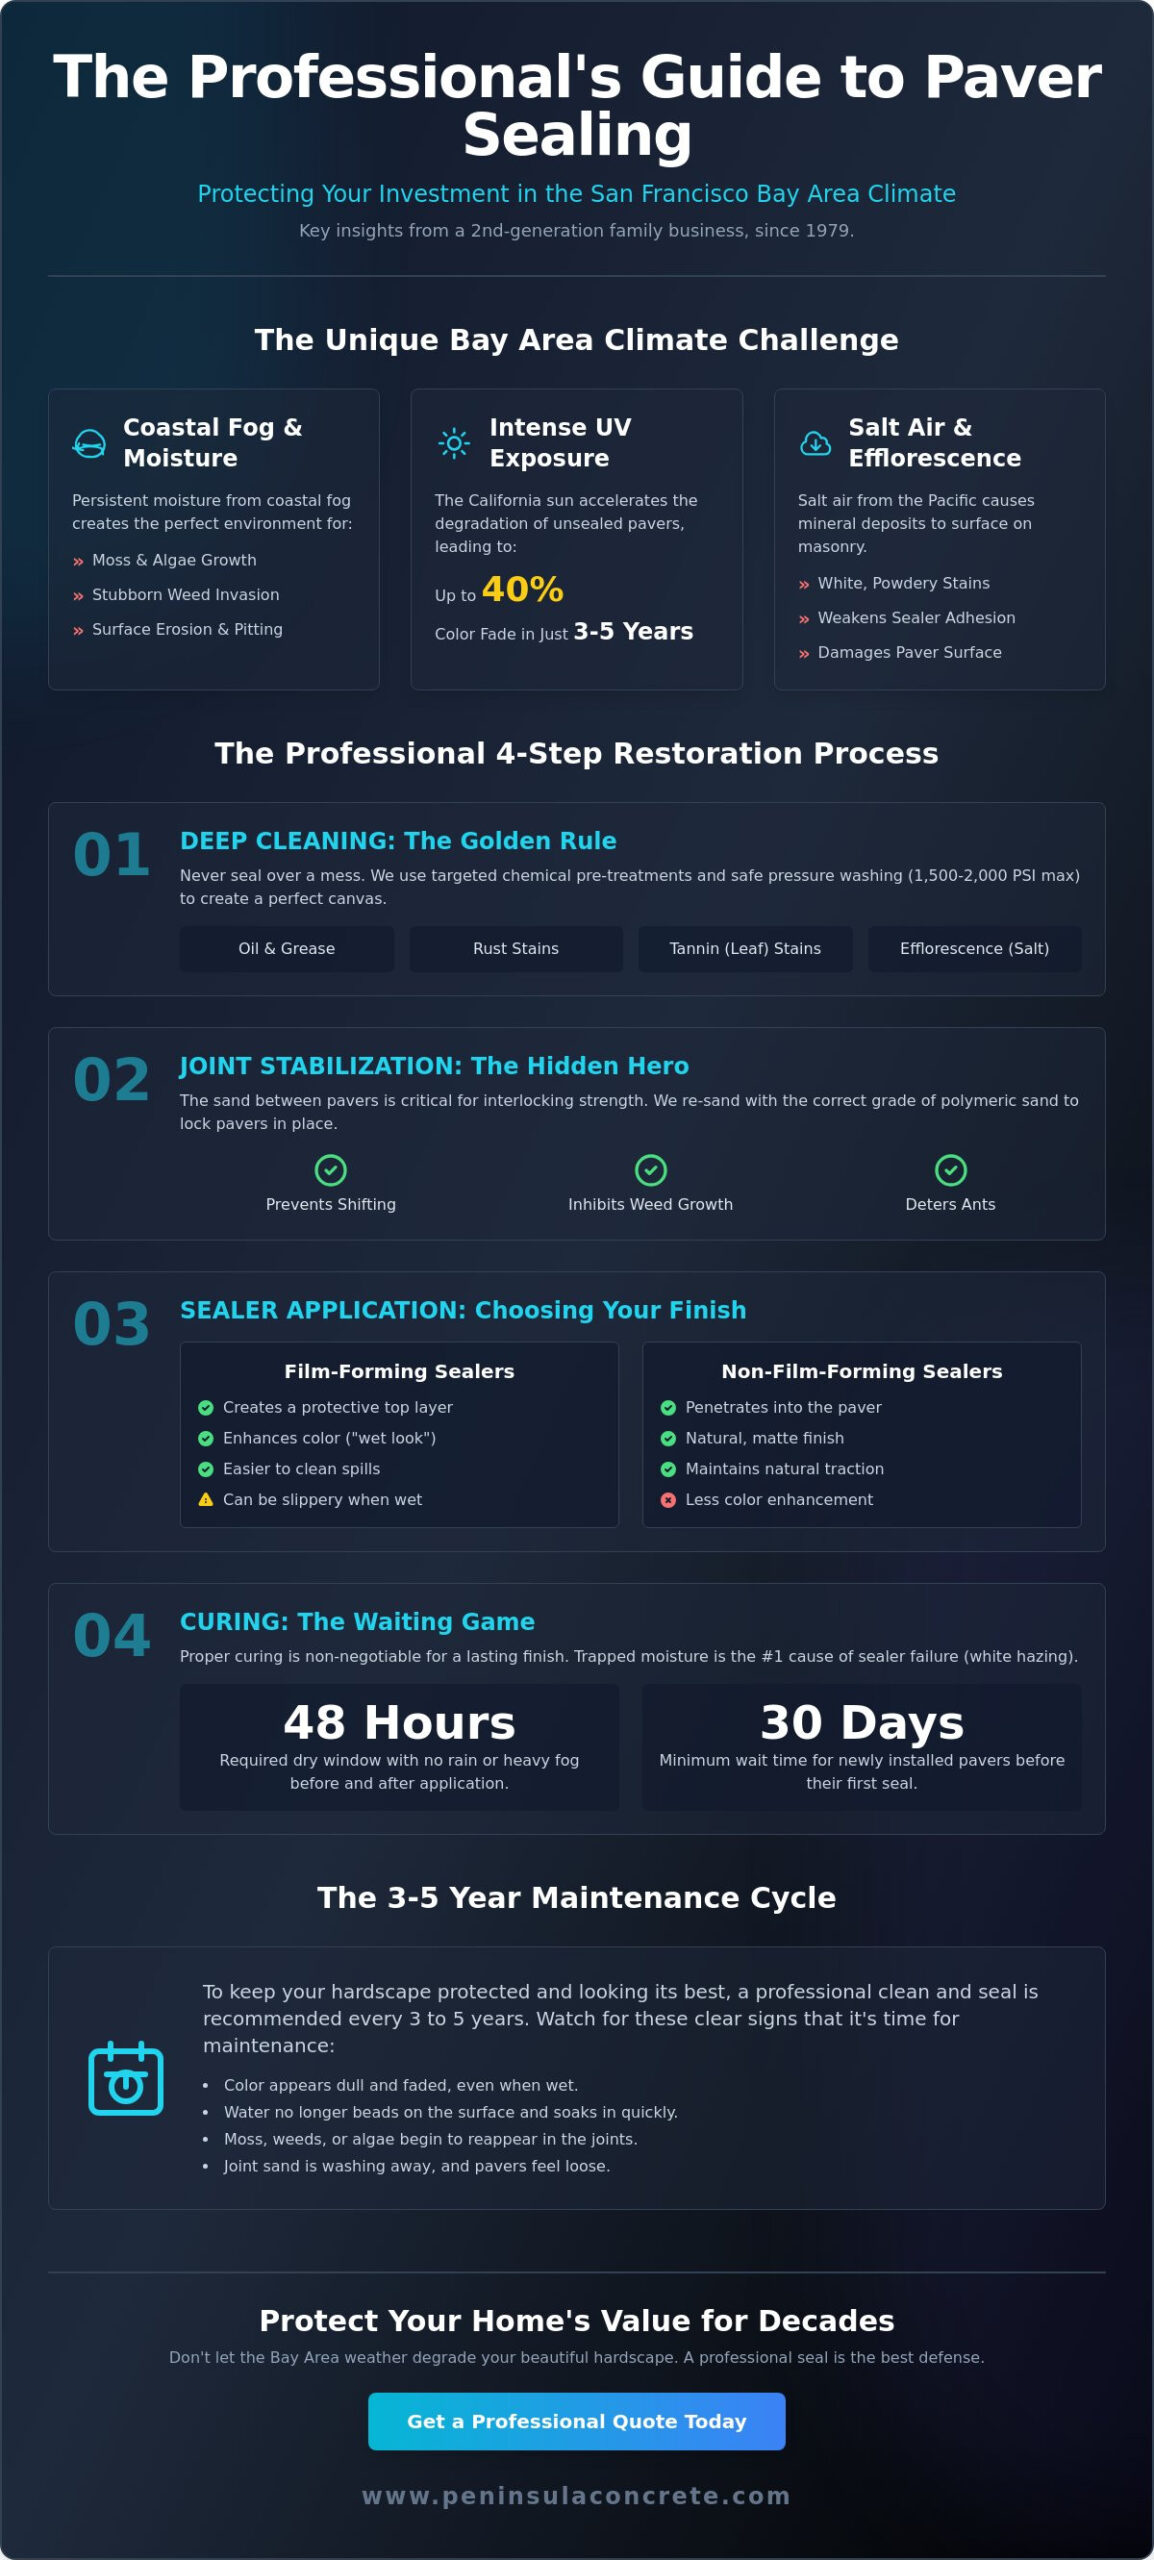
Key Takeaways
- Understand how the unique San Francisco Peninsula climate, including heavy fog and intense UV exposure, impacts the long-term durability of your hardscape.
- Master the professional “clean first” rule for how to clean and seal pavers to ensure oil, rust, and tannin stains are never trapped beneath a new finish.
- Learn why joint stabilization is the “hidden hero” of interlocking strength and how to choose the right sand to prevent shifting and weed growth.
- Evaluate the performance trade-offs between film-forming and non-film-forming sealers to select the ideal aesthetic and protection for your patio.
- Identify the clear signs that your 3-5 year maintenance cycle is due to ensure your outdoor living space remains beautiful and functional for decades.
Understanding Paver Maintenance for Bay Area Climates
Paver cleaning and sealing is a restorative hardscape process designed to renew the appearance and structural health of your outdoor surfaces. Since 1979, Peninsula Concrete has observed how the unique San Francisco Peninsula environment affects stone and concrete installations. Understanding how to clean and seal pavers is essential for any homeowner who wants to protect their investment from the elements. Our local climate, characterized by dense morning fog and intense afternoon sun, accelerates the natural wear of an interlocking concrete paver system. Without a protective barrier, salt air from the Pacific can lead to efflorescence, which is the white, powdery salt deposit that often surfaces on unsealed masonry. Regular maintenance protects the structural integrity of interlocking concrete pavers by stabilizing the joint sand, preventing the units from shifting or wobbling over time.
The Impact of Coastal Moisture and UV
Coastal fog is more than just a weather pattern; it’s a source of persistent moisture that encourages moss, mold, and lichen growth in shaded areas. These organic growths trap water against the stone, which can lead to surface erosion. UV degradation is equally damaging in Northern California. Unsealed pavers often lose up to 40% of their original color intensity within 3 to 5 years due to constant sun exposure. The Bay Area also experiences specific thermal expansion and contraction issues. When cool, damp mornings transition into warm afternoons, the materials expand. A high-quality sealer provides the flexibility needed to handle these shifts while keeping the surface non-porous and easy to wash.
When is the Best Time to Seal in the Bay Area?
Success depends heavily on the weather window. You need to identify a period with 48 hours of no rain or heavy coastal fog to ensure the surface is completely dry. Moisture trapped beneath the sealer creates a cloudy, white haze that is very difficult to fix. Temperature requirements are also strict. You should avoid applying sealer during peak afternoon heat when temperatures exceed 90 degrees, as the product may flash-dry and fail to penetrate the pores. For new projects, we always enforce the 30-day rule. Newly installed systems need at least one month to settle and allow natural salts to escape before a sealer is applied. Following these professional standards for how to clean and seal pavers ensures a finish that lasts for years. Our 2nd-generation, family-owned business prides itself on this level of detail, providing quality work that stands up to the California coast.
Deep Cleaning: Removing Stains and Peninsula Moss
The golden rule of professional masonry is simple: never seal over a mess. Sealing is a restorative process that locks in whatever is on the surface. If you skip a deep cleaning, you’re essentially laminating oil spots and organic growth into the stone forever. Learning how to clean and seal pavers correctly starts with a blank canvas. In the Bay Area, our unique climate means we deal with specific contaminants like tannin from Coast Live Oaks, rust from high-iron irrigation, and oil on high-traffic driveways. We’ve seen these issues across the Peninsula since 1979, and we know that a standard garden hose won’t cut it.
Chemical Pre-treatment Techniques
Before the water starts flowing, we use targeted chemistry to lift deep-set stains. For driveways, we apply alkaline degreasers to break down petroleum-based oil. If you notice white, powdery salt deposits, that’s efflorescence. We treat this with specialized acidic cleaners to ensure the sealer bonds properly. According to ICPI’s technical guide on paver maintenance, removing these mineral deposits is vital for long-term sealer adhesion. For the heavy moss common in shaded areas of San Mateo and Palo Alto, biological cleaners kill spores at the root. This prevents regrowth from pushing through your new sealer in six months.
Pressure Washing Best Practices
High pressure is often the enemy of a high-quality finish. We never exceed 1,500 to 2,000 PSI because excessive force can pit the paver face or expose the aggregate underneath. This damage is permanent. Our teams use professional-grade surface cleaners rather than standard wand tips. These circular tools provide a consistent, even finish without the “tiger stripes” often seen in DIY jobs. We maintain a strict 45-degree angle when rinsing. This technique cleans the stone while leaving the structural joint sand intact. Protecting your local landscaping is our final priority. We use barriers and neutralization techniques to ensure runoff doesn’t harm your heritage oaks or delicate garden beds. If your patio needs a professional refresh, our team at Peninsula Concrete can assess the specific needs of your stone.
The Critical Step: Re-Sanding and Joint Stabilization
Joint sand is the hidden hero of interlocking paver strength. It creates the friction necessary to distribute weight across the entire surface, preventing individual stones from shifting or sinking. Since 1979, we’ve seen how neglected joints lead to structural failure and chipped edges. When homeowners learn how to clean and seal pavers, they often focus on the shine, but the sand is what ensures the installation remains unsurpassed in strength and flexibility. Without proper stabilization, your hardscape is just a collection of loose bricks.
Choosing the Right Sand for Your Hardscape
Polymeric sand is the gold standard for modern Bay Area projects. Unlike regular masonry sand, which washes away during heavy rain or leaf blowing, polymeric sand contains specialized additives that harden when activated by water. This creates a firm, flexible bond that prevents washouts and stops ant hills from forming. It’s the most effective way to achieve long-term weed prevention without using harsh chemicals.
Select a color that complements your specific stone or brick. Grey sand provides a clean, modern look for slate tones, while tan sand enhances the warmth of earth-toned pavers. To calculate your needs, measure your total square footage and joint width. A standard 50-pound bag of polymeric sand typically covers 60 to 75 square feet for narrow joints. For a deeper look at the restoration process, this This Old House guide to restoring pavers offers excellent contractor-level insights into material selection.
Professional Compaction and Activation
Professional results require the vibratory plate method. Once you sweep the sand into the joints, run a plate compactor over the surface. The vibration forces the sand to settle at the very bottom of the joint, eliminating air pockets that cause future sinking. After the first pass, you’ll likely see the sand level drop. Add more sand, sweep again, and repeat the process until the joints are filled to within 1/8 inch of the paver chamfer or edge.
The most dangerous part of the process is the “haze” effect. Before you add water, you must use a leaf blower on a low setting to remove every speck of dust from the top of the pavers. If any polymer residue remains on the stone when it gets wet, it will bond to the surface and create a permanent white film. Once the surface is spotless, follow these steps:
- Set your hose to a fine mist setting.
- Mist the area lightly to dampen the sand without flooding it.
- Wait 10 to 15 minutes between three separate misting passes.
- Avoid creating puddles, as too much water will wash the polymer binders out of the sand.
Curing is the final hurdle. You must wait at least 24 hours for the sand to dry and harden completely before applying any sealant. If the joints are still damp, the sealer will trap moisture inside, leading to cloudiness and a failed finish. This patience is a vital part of how to clean and seal pavers correctly for a lasting, reputable result.
Sealing Your Hardscape: Choosing the Right Finish
Choosing the right sealer is the most critical step in learning how to clean and seal pavers effectively. At Peninsula Concrete, we’ve provided quality work since 1979, and we know that the wrong product can ruin a beautiful installation. You’ll primarily choose between film-forming and non-film-forming sealers. Film-forming products create a protective layer on top of the stone, while non-film-forming options penetrate the pores without changing the surface texture. For most Bay Area homes, water-based sealers are the standard choice because they comply with California’s strict VOC regulations, which often limit volatile organic compounds to 50 grams per liter or less. While solvent-based sealers offer deep color enhancement, they require more precise handling to avoid trapped moisture.
Application methods dictate the longevity of your project. We recommend a two-coat approach for maximum durability. The first coat acts as a primer, soaking into the dry concrete. The second coat builds the wear layer that protects against UV rays and oil spills. Professional-grade pump sprayers provide the most even coverage, but you must follow up with a high-nap roller to ensure the product is pushed into every crevice. This process ensures your hardscape remains “unsurpassed in strength and flexibility,” a hallmark of our family-owned business values since the beginning.
Selecting the Aesthetic Finish
The finish you choose defines your home’s curb appeal. A Natural Look (Matte) finish provides 0% to 5% sheen, which is perfect for traditional or rustic properties where you want the stone’s texture to shine. A Satin or Semi-Gloss finish offers a 20% to 35% sheen; it enhances the color without looking like plastic. For modern designs, a Wet Look (High Gloss) provides a 60% or higher sheen, making colors pop and giving the surface a permanent “just rained” appearance that many homeowners find fantastic.
Application Secrets for a Flawless Result
Success lies in the details of the application. Back-rolling is a non-negotiable step; use a 1/2-inch nap roller immediately after spraying to pick up puddles and prevent white “blush” spots caused by trapped moisture. This step also assists with joint stabilization, as the sealer helps lock the joint sand in place to prevent weed growth. Finally, watch the thermometer. If the paver surface temperature exceeds 90 degrees Fahrenheit, the sealer can flash-dry, creating bubbles. We typically start our sealing projects in the early morning hours to ensure the surface is cool and dry.
Our 2nd-generation team has been perfecting these techniques for over four decades. If you want a professional finish that lasts, contact us to discuss your next hardscape project.
Maintenance and When to Call a Bay Area Professional
A high quality paver installation is a long term investment in your home’s value. To protect that investment, most Bay Area hardscapes require a maintenance cycle of 3 to 5 years. You’ll know it’s time to re-seal when water no longer beads on the surface or when the vibrant colors of the stone begin to look muted. A quick way to test your sealant is to pour a small amount of water on a high-traffic area. If the water soaks into the paver within 60 seconds, the protective barrier has worn away.
Simple habits can extend the life of your sealant between professional visits. Sweep away leaves and organic debris every week to prevent tannin stains. For light cleaning, use a pH-neutral soap and a soft-bristle brush. Avoid using high-pressure nozzles too close to the surface, as this can dislodge joint sand and damage the sealer. Peninsula Concrete has provided quality work since 1979, and we’ve found that consistent, gentle care is the secret to a 20-year driveway.
DIY vs. Professional Restoration
Renting professional-grade pressure washers and sprayers typically costs between $100 and $200 per day. When you add the cost of premium sealants, the price difference between a DIY project and professional mobilization is often smaller than homeowners expect. The primary risk of a DIY approach is “sealer haze” or “white-out.” This occurs when moisture is trapped under the sealant or when the product is applied in humid conditions. Removing a failed sealer often costs 2 times more than the initial application because the surface must be chemically stripped before we can restart the process of how to clean and seal pavers correctly.
Complex projects involving steep driveways or intricate pool decks require specialized traction additives and commercial-grade application gear. Our 2nd-generation, family-owned team ensures the coating is even and safe for foot traffic.
Integrating Maintenance with Other Hardscape Needs
Routine maintenance provides the perfect opportunity to assess the structural health of your entire property. If you notice water pooling near your pavers, it’s wise to consult retaining wall contractors to check for drainage issues or soil pressure. Similarly, if your pavers have shifted or cracked due to root growth, you may need the expertise of sidewalk repair contractors to level the subgrade before you begin the process of how to clean and seal pavers.
- Check for loose or “rocking” pavers.
- Inspect joint sand levels and refill as needed.
- Identify and treat efflorescence (white salt buildup).
- Perform the 60-second water absorption test.
- Verify that water flows away from your home’s foundation.
- Remove oil, grease, or rust stains.
- Check shaded areas for moss or mildew growth.
- Examine edge restraints for signs of shifting.
- Look for “blushing” or peeling from old sealant layers.
- Ensure all walkway surfaces are level and trip-hazard free.
Peninsula Concrete remains committed to honesty and high-quality work. If your project feels too complex for a weekend DIY, let us help take your project from planning to success.
PROTECT YOUR BAY AREA INVESTMENT FOR THE LONG TERM
Maintaining a beautiful outdoor space requires more than just occasional sweeping. Mastering how to clean and seal pavers correctly prevents Peninsula moss from taking root and keeps your interlocking system functioning as intended. Since 1979, Peninsula Concrete Contractors has specialized in these high-quality restoration techniques. Proper maintenance ensures that your hardscape retains the unsurpassed strength and flexibility it was designed for; this is vital in the unique coastal climate of the Bay Area. Whether you’re dealing with stubborn stains or choosing a new finish, professional care protects your home’s curb appeal for decades.
As a 2nd-generation, family-owned business, we’ve built a reputation for honesty and dependable results. We handle the heavy lifting, from deep cleaning to precision re-sanding, so you don’t have to worry about the technical details. Our team brings decades of experience to every project, ensuring your pavers look as good as the day they were installed. Your home deserves the attention of seasoned craftsmen who value quality work above all else.
Start your paver restoration project today with a free estimate from Peninsula Concrete Contractors
We look forward to helping you transform your outdoor living space into a durable masterpiece that lasts for years to come.
Frequently Asked Questions
How long do I need to wait to walk on pavers after sealing?
You can typically walk on your pavers 4 hours after the final coat of sealer has been applied. However, it’s best to wait a full 48 to 72 hours before moving heavy patio furniture or driving vehicles onto the surface. This window allows the chemical bond to reach its maximum durability. In the cooler, humid microclimates of San Francisco or Daly City, we often recommend extending this wait time by an additional 24 hours to ensure the surface isn’t tacky.
Can I seal my pavers if they are damp or if fog is expected?
You shouldn’t seal your pavers if there’s any moisture on the surface or if fog is forecast within 24 hours. Moisture trapped under the sealer creates a failed bond, which results in a cloudy, unattractive finish. In the Bay Area, we monitor local humidity levels closely; a reading above 85% humidity often indicates that the morning fog will prevent the stones from drying properly. We ensure every substrate is bone dry to maintain our standard of quality work since 1979.
Will sealing my pavers make them slippery when wet?
Sealing won’t make your pavers slippery if a professional-grade anti-slip additive is mixed into the final application. These specialized additives increase the coefficient of friction by 20% to 30%, keeping your walkways safe even during heavy winter rains. We always recommend these textured finishes for pool decks or sloped driveways in the Peninsula. Without this additive, high-gloss “wet look” sealers can become slick when wet, which creates a potential hazard for your family.
What is the white cloudy film on my pavers after sealing?
A white cloudy film, often called “blushing,” is usually caused by trapped moisture or efflorescence rising through the concrete. This happens when a sealer is applied to a damp surface or when 100% of the cleaning chemicals weren’t properly rinsed away. If you notice this hazy effect, it often requires a solvent-based wash to reliquefy the sealer and release the moisture. Understanding how to clean and seal pavers correctly from the start prevents these costly and frustrating restorative steps.
How much does it cost to professionally clean and seal pavers in the Bay Area?
According to 2024 industry data from HomeAdvisor, professional cleaning and sealing services typically range from $1.50 to $4.50 per square foot. Total project costs depend on the size of your patio and the level of deep staining present. For a standard 500-square-foot driveway in San Jose or San Mateo, homeowners often see quotes between $750 and $2,250. These figures cover professional-grade materials and the labor required for a high-pressure wash and precision sealer application.
Is polymeric sand better than regular sand for Bay Area patios?
Polymeric sand is significantly better than regular sand because it contains specialized binders that harden when misted with water. This material reduces sand washout by 90% during heavy storms and keeps your pavers locked firmly in place. While regular sand is a cheaper initial option, it doesn’t offer the same long-term structural integrity. For the diverse terrain found across the Bay Area, we’ve found that polymeric sand provides the durability needed to keep interlocking pavers unsurpassed in strength.
Can I change the color of my pavers with a sealer?
You can enhance or subtly shift the color of your pavers by using a “wet-look” or tinted sealer. These products penetrate the surface to darken the natural pigments, which often makes 10-year-old stones look like they were installed yesterday. While a clear sealer won’t change the base color of the concrete, it adds a rich depth that highlights the natural variations in the stone. We help you choose the right finish to complement your home’s existing aesthetic and architectural style.
Does sealing pavers really stop weeds from growing?
Sealing pavers stops weeds from growing by hardening the joint sand and creating a physical barrier against wind-blown seeds. When you learn how to clean and seal pavers using polymeric sand, you eliminate the soft, damp environment where weeds typically take root. While it won’t prevent 100% of growth if organic debris accumulates on top of the stones, it reduces weed emergence by roughly 85% compared to unsealed surfaces. Regular maintenance ensures your patio remains clean and professional for years.