Last November, a homeowner in Menlo Park watched as a single season of Bay Area rain turned their premium interlocking pavers into a breeding ground for stubborn moss and dark oak leaf tannins. It’s a common sight across the Peninsula, where the 25 inches of average annual rainfall can quickly compromise a beautiful installation. You’ve likely noticed weeds creeping into your joints or felt the frustration of seeing your vibrant stone colors fade under intense UV exposure. It’s natural to worry that a heavy-duty pressure washer might do more harm than good to your investment.
This 2026 paver patio maintenance guide shares the professional techniques we’ve perfected since 1979 to ensure your outdoor space remains pristine. We understand that your patio is more than just stone; it’s an extension of your home that deserves expert care. By following our proven methods, you’ll prevent expensive structural repairs and keep your pavers looking as fresh as the day they were installed. We’ll walk you through a simple seasonal checklist and show you exactly how to handle everything from BBQ grease to those persistent San Francisco Peninsula weeds.
Key Takeaways
- Discover how proactive care preserves the structural integrity of your interlocking pavers and prevents the high costs of a total patio replacement.
- Follow our comprehensive paver patio maintenance guide to master deep-cleaning techniques using the right solutions for the San Francisco Peninsula climate.
- Learn the science behind polymeric sand and professional-grade sealants to keep your outdoor living space weed-free and protected from UV damage.
- Establish a year-round maintenance schedule to effectively manage post-rain moss growth in the spring and prepare for summer entertaining.
- Identify when a simple garden hose is enough and when to call in Peninsula concrete experts to avoid costly DIY mistakes like “white clouding.”
Why a Paver Patio Maintenance Guide is Essential for Longevity
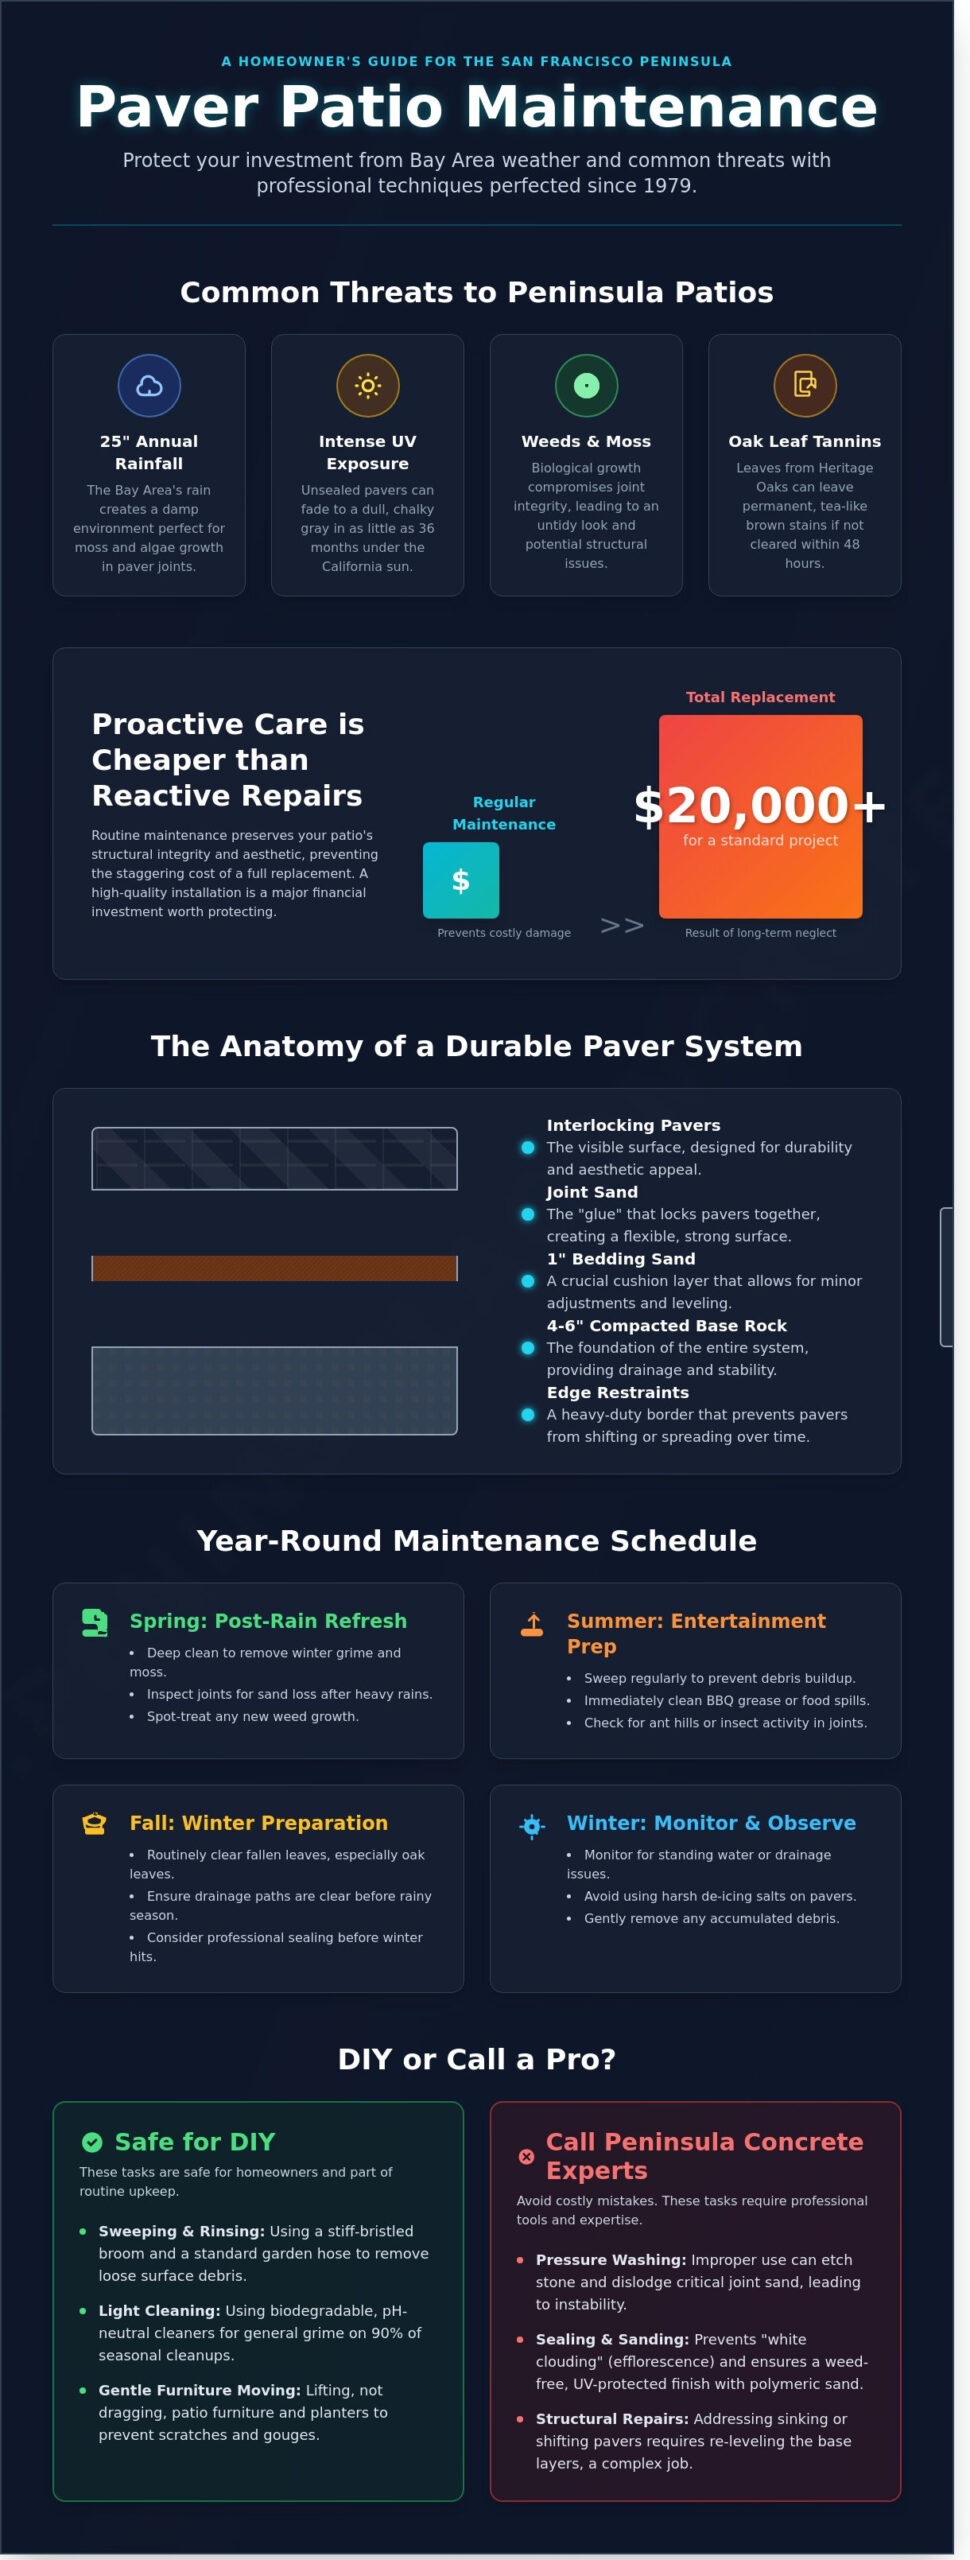
Peninsula Concrete Contractors has provided quality work since 1979. Over the last 45 years, we’ve seen exactly how interlocking pavers perform in the unique climate of Redwood City and the surrounding Peninsula. These systems are famous for their durability. Unlike a single rigid slab of concrete, pavers function as a flexible pavement system. This design allows the surface to move slightly with the natural expansion and contraction of the soil. It’s a mechanical bond that’s hard to beat, but it requires specific care to remain functional.
Following a professional paver patio maintenance guide is about protecting a major financial investment. A high-quality patio installation can cost between $25 and $50 per square foot depending on the materials. Without a routine care plan, the lifespan of these stones can be cut in half. We’ve helped 2nd-generation homeowners restore patios that were neglected for over a decade. The cost of a total replacement often exceeds $20,000 for a standard backyard project. Regular maintenance prevents that financial burden. It keeps your outdoor space looking as good as the day we finished the installation.
The Anatomy of Your Paver System
To maintain your patio, you must understand what’s beneath the surface. Every project we’ve built since 1979 starts with a compacted base rock layer, usually 4 to 6 inches deep. On top of that sits a 1-inch layer of bedding sand. This sand acts as a cushion for the pavers. The joint sand is the most critical component; it’s the “glue” that creates interlock. Many modern installations utilize permeable paving systems to manage heavy rainfall and prevent standing water. Finally, edge restraints are installed along the perimeter. These heavy-duty borders prevent the stones from shifting or spreading outward over time.
Common Threats to Peninsula Patios
The California sun is a constant threat to unsealed pavers. UV degradation can fade the rich pigments of your stones in as little as 36 months. Without a protective barrier, your vibrant charcoal or terra cotta patio will turn a dull, chalky gray. Our local micro-climate adds another layer of difficulty. The persistent morning fog in areas like Woodside or Belmont creates a damp environment where moss and algae thrive in the joints. This biological growth doesn’t just look messy; it can actually push the joint sand out of place, compromising the structural integrity of the entire surface.
- UV Fading: Direct sunlight breaks down the iron oxide pigments used in concrete pavers.
- The Oak Leaf Problem: Redwood City is famous for its Heritage Oaks. These trees drop leaves that contain heavy tannins. If left on a damp patio for more than 48 hours, they leave permanent brown tea-like stains.
- Drainage Issues: Debris buildup in the joints prevents water from flowing away. This leads to “pumping” where the bedding sand becomes saturated and soft, causing individual stones to sink.
Our experience as a local, family-owned business has taught us that proactive care is always cheaper than reactive repairs. We’ve built a reputation for honesty and high-quality work by telling homeowners the truth. You don’t need a total overhaul every five years. You just need a consistent strategy to fight back against the elements. This paver patio maintenance guide provides the professional roadmap you need to ensure your patio remains a fantastic asset for your home for another 40 years.
Protecting the value of such an asset is a core principle in real estate, and experts like County Properties can provide insight into how well-maintained features impact a home’s overall marketability.
The Step-by-Step Guide to Deep Cleaning Your Pavers
Every great outdoor space starts with a clean slate. Before you reach for the hose, clear the entire surface of your patio. Peninsula Concrete Contractors has delivered quality work since 1979, and we’ve seen how improper preparation can lead to avoidable damage. Remove all furniture, grills, and decorative planters using a dolly or a team lift. Dragging a 50-pound wrought iron chair or a heavy ceramic pot can leave permanent gouges in your pavers that no amount of cleaning will fix. Once the area is clear, use a stiff-bristled broom to sweep away loose dirt, leaves, and organic debris.
Choosing the right cleaning solution is the next critical step in this paver patio maintenance guide. For 90 percent of seasonal cleanups, biodegradable soaps or specialized pH-neutral cleaners are the safest choice for your stones and your surrounding landscape. These solutions effectively break down surface grime without harming the local Bay Area watershed. If you’re dealing with deep-set mildew, you might require a stronger chemical solution. According to the ICPI maintenance guidelines, you should always test a cleaner on a small, inconspicuous area first to ensure it doesn’t cause discoloration or degrade the concrete surface.
Removing Stubborn Bay Area Stains
Oil and grease: BBQ areas and driveways are prone to unsightly oil spots. Treat these by applying a liquid degreaser directly to the stain. Let it sit for 20 minutes to lift the oil from the pores of the concrete before scrubbing with a nylon brush and rinsing with warm water.
Tannins and organic matter: Stains from local Oak or Eucalyptus trees can leave dark, tea-colored marks on your patio. These organic stains are stubborn but respond well to specialized tannin removers or a mixture of dish soap and water. Scrubbing these areas promptly prevents the pigments from bonding permanently with the paver surface.
Efflorescence: This is the white, powdery salt that sometimes appears on the surface of concrete products. It’s a natural occurrence caused by water evaporating and leaving minerals behind. Don’t simply spray it with water, as this often triggers more salt to rise. Instead, use a dedicated efflorescence cleaner that neutralizes the salts and restores the original color of your stone.
Safe Pressure Washing Practices
Pressure washing is a powerful tool, but it requires a disciplined hand to avoid ruining your hardscape. Our 2nd-generation, family-owned business always advocates for a “less is more” approach when using high-powered equipment. You should never use a turbo nozzle on pavers. These nozzles create a concentrated, rotating jet that is powerful enough to cut through the concrete surface, leaving permanent swirl marks and exposing the aggregate underneath.
To protect the structural integrity of your patio, maintain a 45-degree angle with your spray wand. This technique directs the water across the surface to lift dirt rather than forcing it straight down into the joints. Spraying directly into the gaps will blast away the stabilizing sand, which can lead to shifting pavers and weed growth. For residential concrete pavers, maintain a pressure range between 1,200 and 1,500 PSI to prevent surface etching and aggregate exposure.
This level of care ensures your outdoor living space remains as durable and beautiful as the day it was installed. If your project requires a professional touch or a complete refresh, contact our team to benefit from our decades of local expertise. We believe in “Concrete Thinking” which means doing the job right the first time to protect your long-term investment.
Polymeric Sand and Sealing: The Secret to Weed-Free Patios
Since 1979, our family-owned business has seen how the right materials transform a basic backyard into a lasting retreat. While play sand was once the standard for filling joints, it often washes away after a single season of heavy rain. Polymeric sand is the professional’s choice because it contains specialized chemical binders. When you activate these polymers with a light mist of water, they create a firm, flexible bond that locks pavers in place. This material doesn’t just sit in the cracks; it becomes a resilient barrier that resists erosion and keeps your hardscape stable for years. This stabilization is a vital part of a comprehensive paver patio maintenance guide for any homeowner who values durability.
The science of sealing goes hand-in-hand with joint stabilization. Sealants generally fall into two categories: film-forming and penetrating. Film-forming sealers create a protective layer on the surface, similar to a clear coat on an automobile. These are responsible for the popular “wet look” finish, which deepens the natural pigments of the stone by 20% to 30%. Penetrating sealers soak into the pores of the concrete without changing the appearance. Both types serve as a shield against the elements. A high-quality sealant prevents weed seeds from germinating in the sand and stops ant colonies from excavating the bedding layer. Without this protection, a patio can lose its structural integrity as insects remove the sand that supports the weight of the stones.
Re-sanding Your Paver Joints
You’ll know it’s time to re-sand when you see joints that have eroded more than 1/8 inch below the chamfered edge of the paver. Before you start, the entire surface must be 100% dry. We call this the “Dry-In” method. If there’s even 5% moisture trapped in the stones, the polymers will activate prematurely and leave a hazy residue on the surface. Professional installers use a plate compactor with a protective pad to vibrate the sand deep into the joints. This compaction ensures there are no air pockets, which prevents the sand from settling and cracking later. According to the ICPI paver maintenance guidelines, proper joint sand level is critical for the interlock that gives these systems their legendary strength.
Choosing the Right Sealant Finish
Selecting a finish depends on your home’s architecture and your personal style. Matte finishes provide protection without adding shine, which is perfect for rustic or traditional designs. Satin finishes offer a subtle glow, while high-gloss options provide a dramatic, mirror-like sheen that works well with modern aesthetics. You also need to choose between solvent-based and water-based formulas. Solvent-based sealers typically last longer and provide better color enhancement, but they have stronger odors during application. Water-based sealers are eco-friendly and dry faster, often allowing for a second coat within 4 hours.
Regardless of the finish, breathability is a non-negotiable feature. Concrete pavers are porous, and moisture from the ground naturally moves upward. A breathable sealer allows this water vapor to “exhale” through the stone. If you use a non-breathable product, moisture gets trapped under the sealer, creating a white, cloudy appearance known as blushing. Using the right products ensures your paver patio maintenance guide leads to a beautiful, functional space rather than a costly repair project. We’ve built our reputation on these technical details since 1979, ensuring every patio we touch stands the test of time.
A Seasonal Maintenance Schedule for San Francisco Peninsula Homeowners
A reliable paver patio maintenance guide follows the specific rhythm of the Bay Area microclimates. At Peninsula Concrete, we’ve provided quality work since 1979, and we know that a “set it and forget it” approach leads to avoidable repairs. Your patio’s needs change as we move from the damp winters of Woodside to the dry, hot summers of Palo Alto.
Spring: By April 15th, the heavy rains usually subside. This is the time for a thorough post-winter inspection. Look for moss in the joints, especially on the north-facing sections of your home where shadows linger. Moss thrives in 55-degree dampness; treat it early with a pH-neutral cleaner to prevent root systems from displacing the joint sand. If you notice 15% or more of your joint sand has washed away, it is time to sweep in new polymeric sand to stabilize the surface.
Summer: June through August brings intense UV exposure that can dull the pigment of your stones. If your pavers haven’t been sealed in 3 to 5 years, check for significant color fading. Summer is also peak BBQ season. Grease from a single July 4th cookout can soak into unsealed concrete within 24 hours, leaving a permanent shadow. Keep a bag of grease-absorbing granules nearby to treat spills immediately before they set.
Fall: As October arrives, leaf management becomes the primary focus. Oak and Maple leaves contain tannins that stain pavers if they are left to rot during the first autumn rains. Clear your patio every 7 days to prevent 100% of organic staining. This is also your final window to ensure your drainage system is clear before the heavy November storms arrive.
Winter: San Francisco Peninsula winters can drop 20 inches of rain in a single season. During January, watch for settling. If you notice a paver has dipped more than 1/4 inch, it indicates a base issue or soil movement that needs professional attention. Catching these “low spots” early prevents them from becoming dangerous trip hazards or deep puddles that undermine the entire installation.
Managing Drainage in Local Hardscapes
Effective drainage is the secret to a patio that lasts 40 years. Clean out channel drains and catch basins every November without fail. We’ve found that 60% of drainage failures are caused by simple leaf clogs in the grates. Ensure downspouts extend at least 3 feet away from the paver edge. If water pools for more than 30 minutes after a storm, your sub-base might be saturated, which requires a professional paver patio maintenance guide assessment to prevent structural failure.
Quick Monthly Habits for a Pristine Patio
Consistency beats intensive labor every time. Spend 5 minutes every Sunday doing a quick sweep; this removes the abrasive grit that wears down paver finishes over time. Spot-treat weeds the moment they appear. A single dandelion can produce 15,000 seeds, quickly turning a clean joint into a garden. Finally, walk the perimeter once a month to check for shifting border stones. If the edge restraint fails, the entire field of pavers will eventually spread and lose its tight interlock.
Our 2nd-generation, family-owned business is here to ensure your investment stands the test of time. Contact our team today to schedule a professional evaluation of your patio’s drainage and structural integrity.
When to DIY vs. Hiring Peninsula Concrete Contractors
Regular upkeep keeps your outdoor space functional without a massive time commitment. You can manage minor issues with a standard garden hose and a stiff-bristle broom. A 10-minute weekly sweep prevents organic debris like leaves and twigs from breaking down and creating tannins that stain your stones. If you catch a spill early, a simple mixture of dish soap and warm water usually does the trick. These basic tasks are the foundation of any effective paver patio maintenance guide and don’t require professional intervention.
Structural red flags demand a more experienced eye. If you notice a 1-inch dip in your walking path or gaps wider than 0.25 inches between stones, your base has likely failed. This often indicates poor soil compaction or drainage issues beneath the surface. Our 2nd-generation team has analyzed Peninsula soil conditions since 1979; we know how to identify if the sub-base needs localized repair or a full reset. Ignoring these shifts leads to tripping hazards and accelerated wear that a simple broom cannot fix.
DIY sealing mistakes are the most common reason homeowners call us for emergency restoration. Many residents attempt to apply hardware-store sealants on damp pavers, leading to “white clouding.” This happens when moisture gets trapped under the acrylic layer, creating a milky, opaque film that ruins the aesthetic. Stripping a botched seal job costs 3 times more than a professional application. We use industrial-grade solvents and wait for specific moisture-meter readings to ensure a crystal-clear finish every time.
Professional Restoration Services
Our restoration process goes far beyond what a homeowner can achieve with rented equipment. We utilize industrial steam cleaners that reach temperatures over 200 degrees Fahrenheit to melt away 98% of deep-set oil stains and tire marks. Following the cleaning, we provide specialized services to bring your patio back to its original glory:
- Precision Leveling: We pull up sunken pavers and reinforce the bedding sand to eliminate standing water.
- Polymeric Sanding: We use high-performance jointing sand that resists weed growth and ant infestations.
- Industrial Sealing: Our breathable, professional-grade sealers come with 3-to-5-year warranties to protect against UV fading.
Start Your Maintenance Project Today
Investing in regular maintenance is a smart financial move for any Peninsula homeowner. A full patio restoration typically costs only 15% of the price of a total tear-out and new installation. Since 1979, we’ve focused on “Quality Work Since 1979” to help our neighbors avoid unnecessary replacement costs. Our family-owned business prides itself on honesty; if your patio only needs a deep clean rather than a full repair, we’ll tell you directly. Don’t let small cracks turn into a $15,000 replacement project. Get a free maintenance estimate for your Peninsula home and let our 40-plus years of experience work for you. Using this paver patio maintenance guide as your starting point ensures your stone surfaces remain a highlight of your property for decades to come.
Of course, for those facing a full replacement or planning a new outdoor project, it’s also an opportunity to consider alternative materials that require less upkeep. While traditional pavers offer a classic look, modern composite decking from innovative manufacturers like Green Plank provides a durable, low-maintenance option that resists many common issues like staining, moss, and UV fading.
KEEP YOUR BAY AREA PATIO LOOKING PRISTINE
Protecting your outdoor investment starts with the right habits. This paver patio maintenance guide shows that a consistent seasonal schedule and a 2-year sealing cycle are the best ways to prevent weed growth and structural shifts. Deep cleaning your interlocking pavers doesn’t just improve aesthetics; it preserves the strength of the entire system for decades. When you stay ahead of the weather on the San Francisco Peninsula, your outdoor space stays functional and beautiful regardless of the season.
Peninsula Concrete has delivered Quality Work Since 1979. As a 2nd-generation, family-owned business, we’re specialists in interlocking paver systems who understand the unique needs of local homeowners. We’ve built our reputation on honesty and high-quality results over the last 45 years. If your patio needs professional attention, our experienced team is ready to help. Start your patio restoration project today to ensure your stonework remains a highlight of your home. We’re excited to help you revitalize your outdoor living area and keep your property looking its best.
Frequently Asked Questions
How often should I seal my paver patio in the Bay Area?
You should seal your pavers every 3 to 5 years to protect their color and structural integrity. While our local weather is mild, the California sun provides 260 days of UV exposure annually that breaks down protective coatings. We’ve found that a 3 year cycle works best for high-traffic pool decks or driveways to prevent fading and surface wear, a standard of care echoed by pool maintenance specialists like The Pool People who understand the importance of a well-maintained pool environment.
Will power washing my pavers ruin the sand between them?
High-pressure washing will definitely blast the sand out of your joints if you aren’t careful. If you use a setting above 1,500 PSI or hold the nozzle closer than 12 inches to the surface, you’ll likely remove the stabilizing material. This paver patio maintenance guide recommends using a wide-angle fan tip and keeping the wand at a 45-degree angle to protect the joint sand.
How do I stop weeds from growing in my paver cracks forever?
You can stop 95% of weed growth by using high-quality polymeric sand in the joints. This specialized sand contains chemical binders that harden like concrete when activated with water, creating a barrier that seeds cannot penetrate. Since 1979, we’ve seen that maintaining this solid joint is the only way to prevent organic matter from collecting and fueling weed growth.
What is the best way to remove white stains from my pavers?
The best way to remove these white stains, known as efflorescence, is with a specialized acidic cleaner designed for masonry. These salts often appear within the first 12 months after installation as lime deposits migrate to the surface. Don’t just scrub with water; you need a solution with a pH balancer to dissolve the salt crystals without damaging the paver face.
Can I use regular sand to fill my paver joints?
You shouldn’t use regular play sand or masonry sand because it lacks the binding agents needed for stability. Regular sand washes away during a single heavy rainstorm and encourages ant hills to form in the gaps. We always use polymeric sand because it locks the pavers together, which is why interlocking systems are unsurpassed in strength and flexibility.
How long do I need to stay off my patio after it has been sealed?
You must wait at least 4 hours for foot traffic and a full 48 hours before moving heavy furniture or vehicles back onto the surface. If the temperature is below 60 degrees, the curing process can take up to 72 hours. Walking on the sealer too early can leave permanent footprints or smears in the finish that are difficult to remove.
Is it better to use a water-based or solvent-based sealer for California homes?
Water-based sealers are the superior choice for California homeowners because they comply with strict state VOC regulations. These products provide a breathable finish that allows moisture to escape while still protecting the stone. They don’t produce the harsh chemical odors associated with solvent-based products, making them safer for your family and the local environment.
What happens if I never maintain my paver patio?
If you ignore your paver patio maintenance guide, your installation will likely fail within 10 to 15 years. Without regular cleaning and sanding, joints erode and allow pavers to shift or tilt, creating trip hazards. Neglected patios often see a 40% decrease in structural stability as water penetrates the base layer, leading to costly repairs that could have been avoided with simple care.