That subtle bow in your retaining wall, the new crack you just noticed, or the marshy ground that’s formed behind it-these aren’t just cosmetic issues. They are urgent warning signs. The silent, immense force of hydrostatic pressure from trapped water is the number one cause of retaining wall failure. A beautiful, durable wall isn’t just about the blocks you can see; it’s about the unseen system working behind the scenes. That system is proper retaining wall drainage, and getting it right is the key to protecting your investment for decades to come.
In this complete guide, we draw on decades of hands-on experience to demystify this critical process. You will learn exactly why drainage is non-negotiable, discover the most reliable methods used by Bay Area professionals, and understand how to spot the difference between a high-quality job and one destined for failure. Our goal is to give you the knowledge and confidence you need to ensure your wall is built to last, providing you with a stable, beautiful landscape and lasting peace of mind.
Key Takeaways
- Understand how hydrostatic pressure-the force of water-saturated soil-is the single biggest threat to your retaining wall’s stability.
- Discover the key components of an effective retaining wall drainage system and learn which methods are best suited for your property’s unique challenges.
- Protect your investment by learning to spot the common installation shortcuts and errors that lead to premature wall failure.
- Recognize when a project’s complexity requires professional expertise to ensure your wall is built correctly and stands for decades.
Why Drainage is Non-Negotiable for Retaining Walls
A retaining wall is built for one primary purpose: to hold back soil. But the soil itself isn’t the wall’s greatest enemy-water is. When water saturates the soil behind your wall, it creates immense force known as hydrostatic pressure. This silent, powerful pressure is the number one cause of retaining wall failure. For Bay Area homeowners, our heavy clay soils and distinct rainy seasons make a proper retaining wall drainage system an absolute necessity, not an optional upgrade.
Ignoring this fundamental requirement leads to predictable and costly problems. The first signs of trouble are often visual:
- Bulging: The wall begins to bow outwards in the middle.
- Cracking: Vertical or stairstep cracks appear as the structure is stressed.
- Leaning: The entire wall starts to tilt forward from the top.
These are not minor cosmetic issues; they are clear warnings that your wall is losing its fight against the weight of water-logged earth.
Understanding Hydrostatic Pressure
Imagine the force of water pushing against the sides of a full swimming pool. Now, apply that same concept to the soil behind your retaining wall. Rainwater seeps into the ground and gets trapped, adding thousands of pounds of weight. This pressure exerts a relentless outward push that, over time, can overcome even the strongest materials. This is why sound retaining wall design principles always prioritize water management as a core component of structural integrity.
The Costly Consequences of Poor Drainage
A wall without effective retaining wall drainage is a wall that is destined to fail. What begins as a small crack can quickly progress to a major bulge and, eventually, a catastrophic collapse. This failure doesn’t just destroy the wall itself; it can lead to significant soil erosion, damage to your landscaping, and even threaten your home’s foundation. The cost to excavate a failed wall, repair the surrounding property, and build a new one correctly is always far greater than the investment in proper drainage during the initial construction.
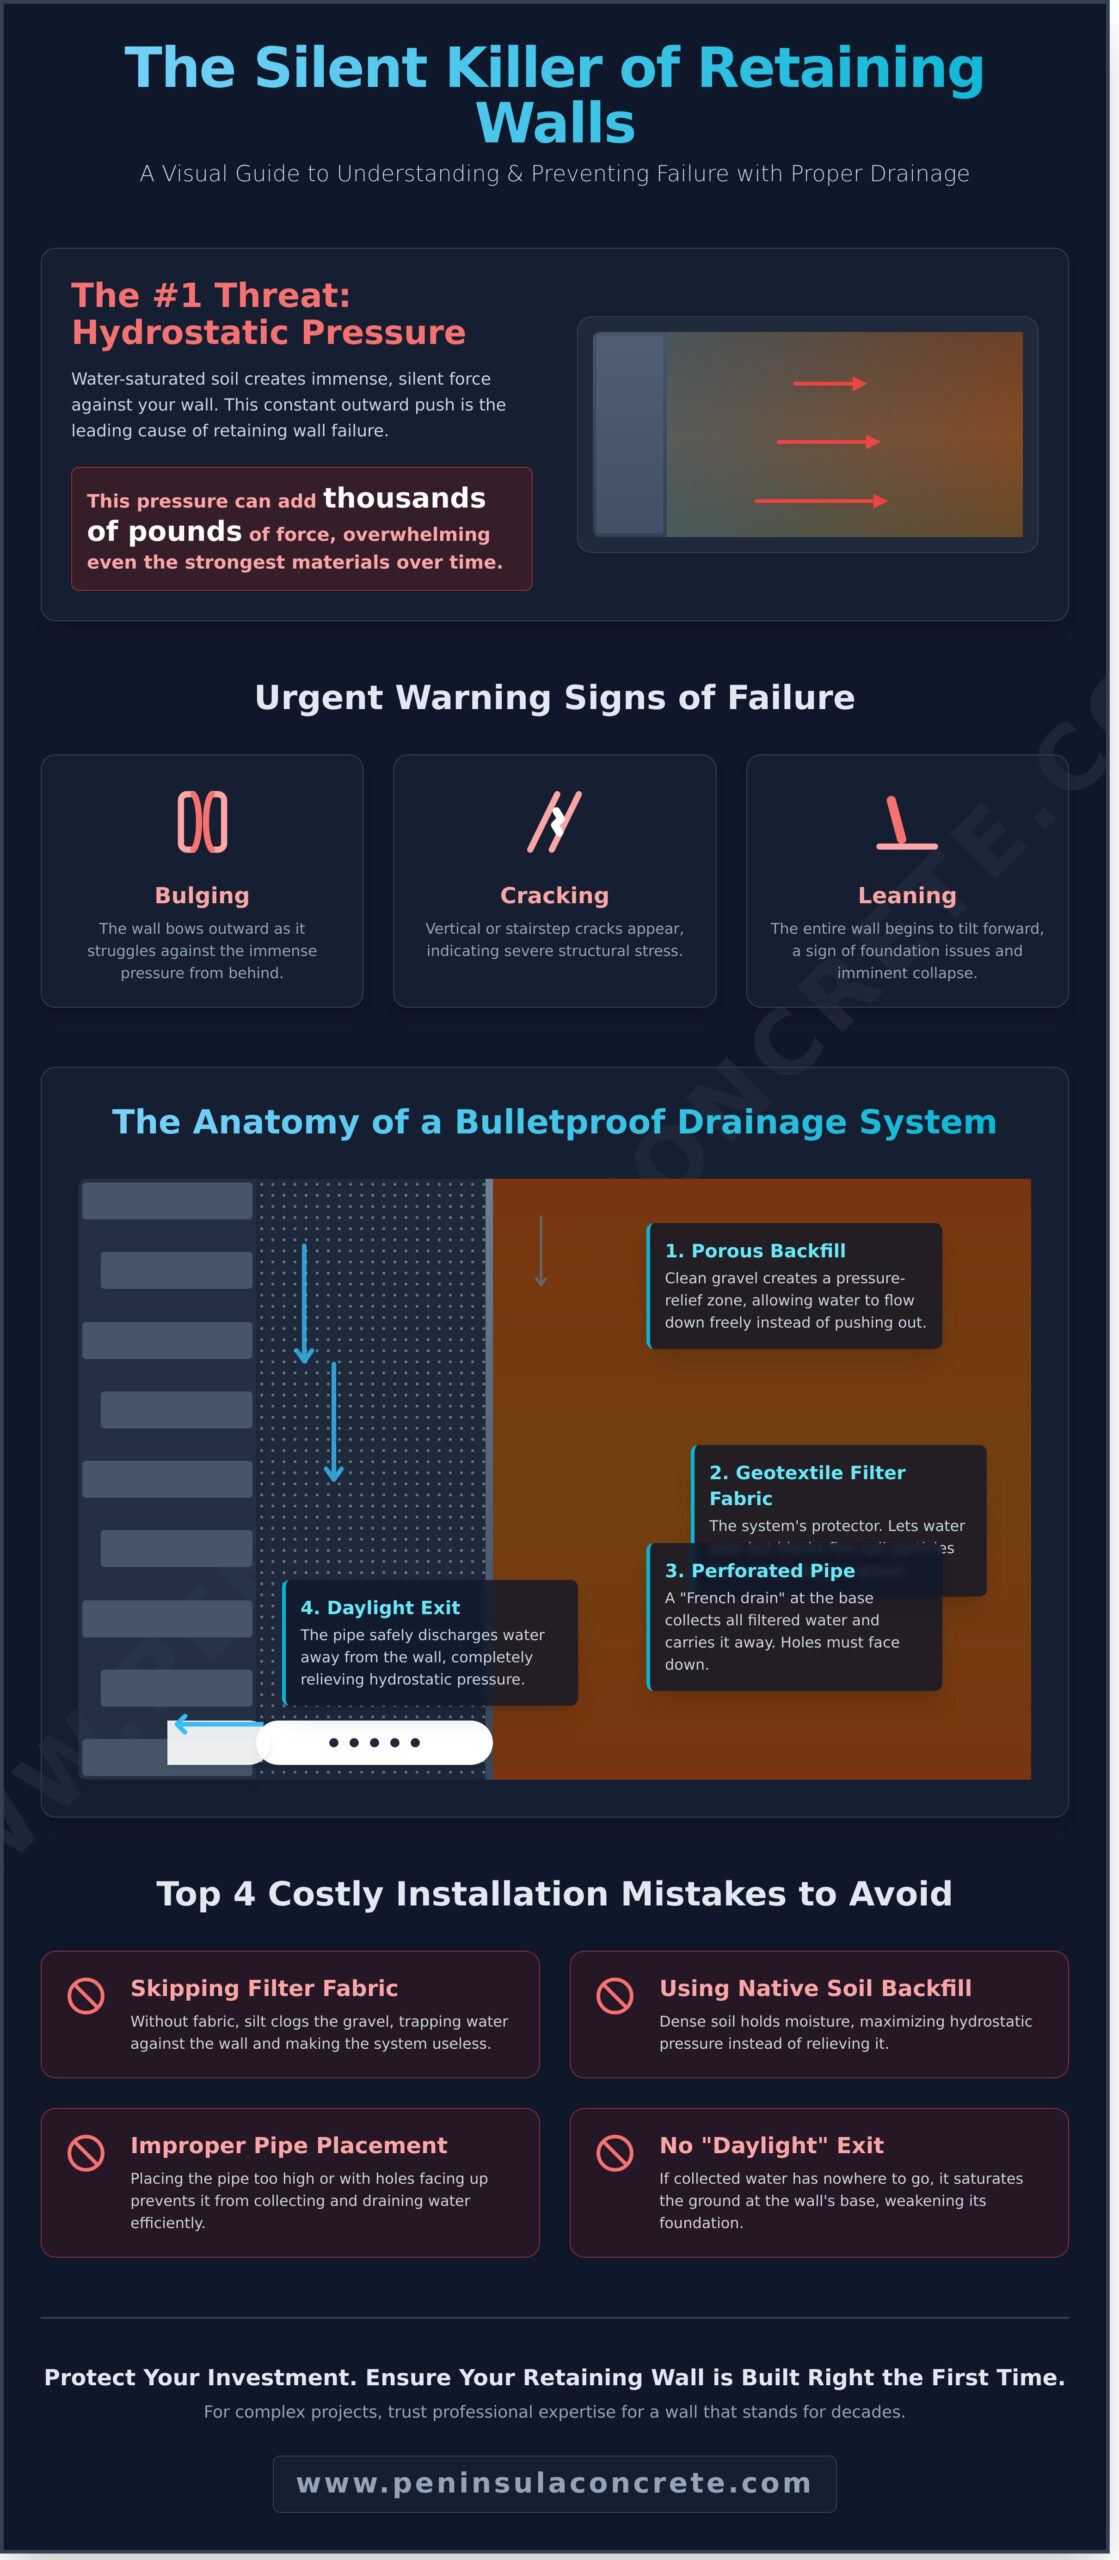
The Anatomy of an Effective Retaining Wall Drainage System
A proper retaining wall drainage system is more than just a pipe; it’s a carefully engineered pathway designed to manage hydrostatic pressure from start to finish. Think of it as a multi-stage process where each component plays a vital role in protecting your investment. When water saturates the soil behind your wall, this system provides a clear, controlled route for it to escape, safeguarding the wall’s structural integrity for decades to come.
Here is how the components work together to move water safely away from your wall:

An illustration of a complete drainage system behind a retaining wall.
Porous Backfill: The First Line of Defense
The first step in managing water is giving it an easy path to travel. Instead of backfilling with dense native soil that holds moisture, a proper installation uses a column of clean, 3/4-inch crushed gravel or stone directly behind the wall. This material doesn’t compact like soil, creating thousands of tiny vertical channels for water to flow freely downward under the force of gravity, rather than pushing horizontally against your wall.
Geotextile Filter Fabric: The System’s Protector
This is the unsung hero of a durable drainage system. This high-quality, permeable fabric is placed between the gravel backfill and the surrounding native soil. Its sole job is to let water pass through while blocking silt, clay, and other fine particles. Without this protective layer, the gravel would eventually become clogged with sediment, rendering the entire drainage system useless. Skipping this step is a common but costly mistake.
Perforated Pipe: The Water Superhighway
At the base of the gravel column sits a perforated pipe, often called a French drain. This pipe acts as the system’s main artery, collecting all the water that has filtered down through the gravel. The design and placement of these components are critical, as outlined in official guidelines for retaining wall drainage systems from transportation authorities like Caltrans. For maximum efficiency, the pipe should be installed with the perforation holes facing downward to collect water that has settled at the bottom.
The Daylight Exit: Releasing the Pressure
Finally, the collected water needs a safe place to go. The perforated pipe is graded to slope gently toward an outlet point, known as a “daylight exit,” where it can discharge harmlessly onto the ground surface away from the wall’s foundation. In some designs, small “weep holes” are also installed through the face of the wall to provide additional pressure relief. A clear, unobstructed exit path is non-negotiable for long-term success.
Common Drainage Solutions: Which is Right for Your Wall?
Once you understand the need for drainage, the next step is choosing the right system. A professional contractor will assess your specific property-considering soil type, slope, and wall height-to recommend the most effective solution. Understanding these common options will help you have a productive conversation and ensure your project is built for long-term stability.
Proper retaining wall drainage isn’t a one-size-fits-all solution. Below are the most common strategies we use in residential projects, from the industry standard to more specialized applications.
The Standard: Gravel Backfill with a French Drain
For most concrete, block, or stone retaining walls over three feet tall, this is the most reliable and trusted method. The system consists of three key components:
- Gravel Backfill: A column of clean, crushed stone is placed directly behind the wall, creating a porous zone for water to travel down easily.
- Perforated Pipe: A pipe with small holes sits at the base of the wall, collecting the water from the gravel.
- Outlet: The pipe is sloped to carry water away from the wall to a safe discharge point, such as a storm drain or a dry well.
This comprehensive approach actively collects and removes hydrostatic pressure. The principles behind this system are well-established, forming the basis of nearly every professional retaining wall drainage design guide and ensuring durable, high-quality performance for decades.
Weep Holes: A Simpler (But Limited) Approach
Weep holes are small openings or pipes placed at the base of the wall that allow trapped water to escape through the front face. While simple, their application is very limited. They are best suited for smaller, gravity-style garden walls under three feet that are not holding back a significant slope. Their main drawback is a tendency to clog with soil and debris, rendering them useless. They can also cause unsightly staining on the wall face as water and sediment drain out.
Advanced Options: Blanket and Chimney Drains
These terms refer to specific patterns for placing the gravel backfill. A “chimney drain” uses a vertical column of gravel against the wall, while a “blanket drain” covers the entire back of the wall with a layer of gravel. These are not typically necessary for standard residential walls but may be specified by a structural engineer for very tall, critical, or commercial retaining walls where managing immense water pressure is paramount. A reputable contractor will know when to consult an engineer for such a design.
Top 4 Drainage Installation Mistakes That Lead to Failure
A retaining wall is only as strong as the drainage system behind it. Since 1979, we’ve seen countless walls fail prematurely, not because of the blocks, but because of what was happening behind them. Shortcuts in drainage installation are a common way for inexperienced contractors to cut costs, leaving homeowners with a ticking time bomb.
Use this as a checklist to ensure your project is built for durability and long-term performance. A correctly installed retaining wall drainage system is the single most important factor in its longevity.
Mistake #1: Using Native Soil as Backfill
The temptation to reuse the dirt excavated on-site is strong, as it saves on material and disposal costs. However, this is often the root cause of wall failure. Most native soils, especially in our area, have high clay content. Instead of allowing water to pass through, clay soil acts like a sponge, trapping moisture directly against your wall and creating immense hydrostatic pressure.
Mistake #2: Incorrect Pipe Placement
For a drainage system to work, the perforated pipe must be placed at the very bottom of the wall, right alongside the footing. We often see pipes installed halfway up the backfill. This critical error creates a “bathtub” at the base of the wall, allowing the soil to become fully saturated before the water even reaches the drain. The pipe must also have a slight, consistent slope (around 1/8″ per foot) to carry water away effectively.
Mistake #3: Forgetting the Filter Fabric
A proper drainage system uses clean gravel to create a path for water. But without protection, that gravel will eventually become clogged with silt and fine soil particles. Geotextile filter fabric is the unseen hero that prevents this. It wraps around the gravel and pipe, allowing water to pass through freely while blocking the sediment that would otherwise turn your drainage system into a useless, buried feature.
Mistake #4: No Clear Exit Point
A drainage pipe that collects water is only half a system; that water must have a safe place to go. The pipe must terminate at a clear exit point, a practice known as “daylighting.” This means routing it to a lower grade on your property where water can flow out and away from any structures. Terminating a pipe into another patch of dense, non-draining soil simply moves the problem elsewhere.
Ensuring these details are handled correctly is a hallmark of a quality-focused, experienced contractor. If you have questions about your existing wall or are planning a new one, trust the team with a proven heritage of getting it right. Contact Peninsula Concrete today to ensure your project is built to last.
Hire a Bay Area Expert for a Wall Built to Last
Understanding the components of a retaining wall is one thing; assembling them correctly to withstand immense force is another. The success and safety of your wall hinge on expert execution, especially when it comes to managing hydrostatic pressure. A professionally engineered retaining wall drainage system isn’t a luxury-it’s the most critical factor in preventing bowing, cracking, and catastrophic failure. Investing in professional installation from the start is the only way to ensure your wall stands strong for decades to come.
What to Ask a Retaining Wall Contractor
When you vet a contractor, you are protecting your property and your investment. An experienced, reputable professional will welcome detailed questions and provide clear, confident answers. Before signing any contract, be prepared to discuss the specifics of your project and ask the following:
- Are you licensed, bonded, and insured to build retaining walls in my city?
- What type of granular backfill will you use and why is it right for my property’s soil?
- Can you walk me through your complete drainage plan, including the pipe, filter fabric, and weep hole locations?
- How will you compact the soil and prepare the footing to ensure a stable foundation?
The Peninsula Concrete Contractors Promise: Quality Since 1979
At Peninsula Concrete Contractors, we believe that quality is non-negotiable. That’s why a robust retaining wall drainage system is standard on every wall we build, never an optional upgrade. As a 2nd-generation, family-owned business serving the Bay Area since 1979, we have built our reputation on high-quality, durable concrete work that lasts.
Our team possesses deep, localized expertise with the region’s challenging conditions-from expansive clay soils to the demands of our wet winters. We understand precisely how to engineer solutions that manage water effectively, protecting your landscape and property from erosion and soil movement. We don’t just build walls; we engineer lasting solutions designed for maximum safety, longevity, and peace of mind.
When you work with us, you’re choosing a partner with a proven heritage of quality. Let’s build a wall you can depend on. Get a free, no-obligation estimate for your project.
Build a Retaining Wall That Lasts a Lifetime
A retaining wall is only as strong as its ability to manage water. The key takeaway is simple: hydrostatic pressure is the primary cause of wall failure, and a well-designed drainage system is your non-negotiable defense. From selecting the right backfill and perforated pipe to avoiding common installation mistakes, every detail matters in ensuring your investment stands strong against the elements for decades to come.
Getting your retaining wall drainage right requires deep expertise, especially with the unique and challenging soil conditions here in the Bay Area. At Peninsula Concrete, we bring that specialized knowledge to every project. As a 2nd-generation, family-owned business, we’ve been delivering quality work since 1979. We understand precisely how to design and install systems that protect your property and provide lasting peace of mind.
Don’t risk the structural integrity of your landscape on an improper installation. Protect your investment by partnering with a team that has a proven heritage of excellence. Schedule a free consultation for your retaining wall project today. We look forward to building something durable and reliable together.
Frequently Asked Questions About Retaining Wall Drainage
Can you add drainage to an existing retaining wall?
Yes, it is often possible to add drainage to an existing retaining wall through a process called retrofitting. This typically involves excavating the soil behind the wall to install a proper system with gravel and a perforated pipe. It is a complex job that requires professional expertise to avoid compromising the wall’s structural integrity. We recommend a professional assessment to determine the safest and most effective approach for your property to ensure a high-quality, lasting solution.
How much does a proper retaining wall drainage system cost?
The cost of a retaining wall drainage system depends on factors like the wall’s size, site accessibility, and whether it’s a new build or a retrofit. Integrating drainage during initial construction is the most cost-effective method. On average, a professionally installed system can range from $25 to $50 per linear foot. For an accurate and honest estimate based on your project’s specific needs, it is best to consult with an experienced contractor.
Does a short garden wall (under 3 feet) still need drainage?
While building codes may not always require it, we strongly recommend drainage for all retaining walls, regardless of height. Even a short wall can trap a significant amount of water, leading to pressure that causes bowing, cracking, or failure over time. In the Bay Area, where we see heavy seasonal rains, a simple drainage system is a wise investment in the longevity and durability of your wall, preventing costly future repairs.
What are the first signs that my current wall has a drainage problem?
The earliest signs of a drainage problem are often visible on the wall itself. Look for leaning, bulging, or cracking in the structure. You may also see damp spots or a white, chalky substance called efflorescence, which indicates water is seeping through the wall material. Another clear signal is soil erosion at the base of the wall after it rains. Addressing these issues promptly is crucial to prevent more significant structural damage.
How long should a retaining wall with good drainage last?
A professionally constructed retaining wall with a high-quality drainage system is built to last. Depending on the materials used, you can expect a lifespan of 50 to 100 years. Proper drainage is the most critical factor in preventing the immense hydrostatic pressure that leads to premature failure. Investing in a proper system from the start is the best way to protect your property and ensure a durable, long-lasting structure that stands the test of time.
Is a permit required to build a retaining wall in the Bay Area?
Permit requirements in the Bay Area vary by city and county. Generally, a permit is required for retaining walls over 4 feet in height, measured from the bottom of the footing. However, some local jurisdictions have stricter rules for walls over 3 feet. It is essential to check with your local building department before starting any project. As experienced local contractors, we can help navigate the permitting process to ensure your project is fully compliant with all regulations.